State Route Web (SRweb) Help 
Help Contents
Introduction
System Requirements
Selecting a Region
SRweb Controls List
Selecting a Route
Selecting an Image
Viewing Road Images
More About SRweb
SRweb Additional Features
Copying
Emailing
Printing
Saving
Introduction
SRweb allows Internet users to view Washington State Highways using a web browser. Customers can view a
portion of the Washington State Highway Log, click a milepost of interest, and view images at that location.
SRweb allows users to move one image at a time forward or backward.
^ Return to Top
System Requirements
SRweb requires a computer with an installed web browser that supports JavaScript. SRweb has been tested with Netscape 2.0, 3.X, 4.X and Internet Explorer 3.X, 4.X & 5.X.
^ Return to Top
Selecting a Region
At the top left of SRweb's main window is the Select A Region Map.
Step 1: To select a region of interest, click on the appropriate region abbreviation on the Select A Region Map.

SRweb Controls List
The following table contains a list of SRweb controls used while viewing images and an explanation of what those controls do:
|
Control
|
Action
|
|
|
Show the highway log for the region selected on the "Select a Region" map |
|
|
Select to view images in the increasing (North or East) milepost direction |
|
|
Select to view images in the decreasing (South or West) milepost direction |
|
|
Move view forward by jump factor |
|
|
Move view backwards by jump factor |
|
|
Set milepost interval between images |
^ Return to Top
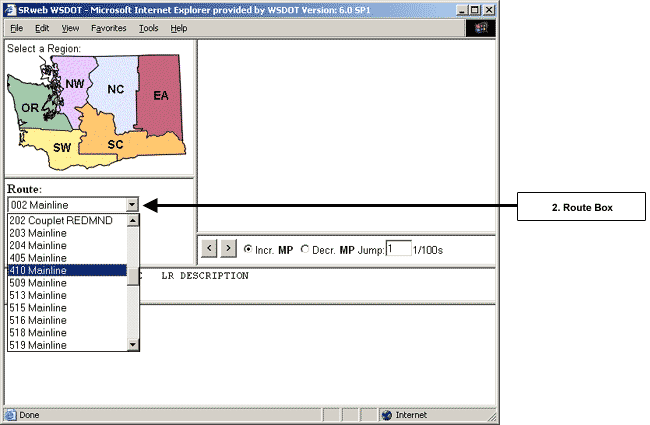
Selecting a Route
On the left of the SRweb main window, under the Select a Region Map, is the Route Window.
Step 2: Click on the Dropdown Arrow in the Route Box and click the appropriate state route.
For this example, 410 Mainline is the selected state route.
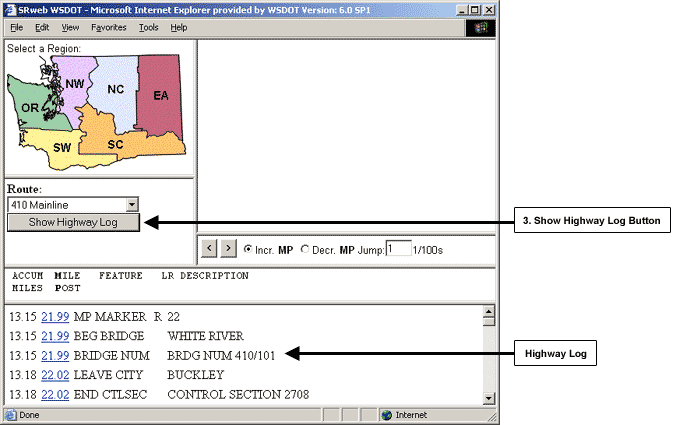
Step 3: After the state route is selected, click the  button in the Route Window. button in the Route Window.
The Highway Log of the selected state route will appear at the bottom of SRweb's main window. The Highway
Log has five columns: Accum Miles, Mile Post, Feature, LR, and Description. The table below explains the
highway log columns in more detail.
| Accum Miles |
The route mile accumulated from the beginning of a State Route in the direction of the roadway |
| Mile Post |
Sequential number, in designated direction of travel, of 1/100 mile increments |
| Feature |
Feature of the road at the corresponding milepost |
| LR |
Left/Right indicator showing location of feature in relation to increasing direction of roadway |
| Description |
Description of Feature |
^ Return to Top
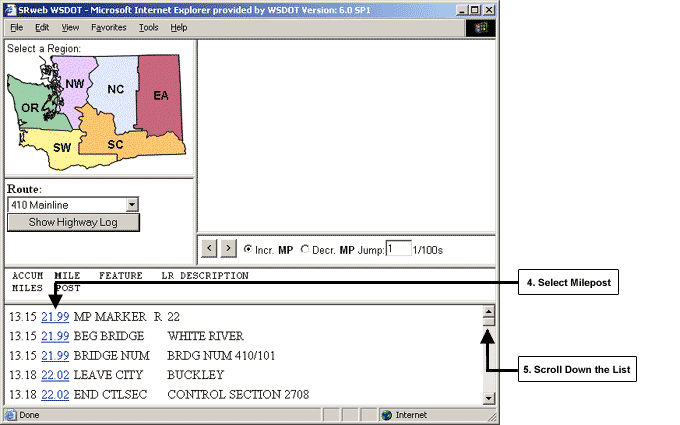
Selecting an Image
Step 4: Click on a specific milepost in the milepost column of the Highway Log.
For this example, milepost 49.00 is selected.
Step 5: Scroll down the list by dragging (holding down the left mouse button and moving down) the Vertical Scroll Bar if a desired
milepost is not visible in the Highway Log.
Viewing Road Images
The image corresponding to the previously selected milepost should now be visible in SRweb's main window.
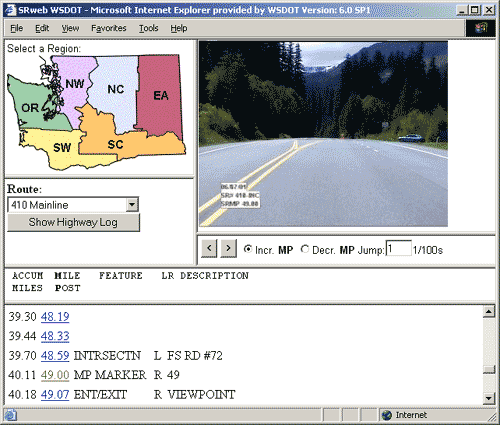
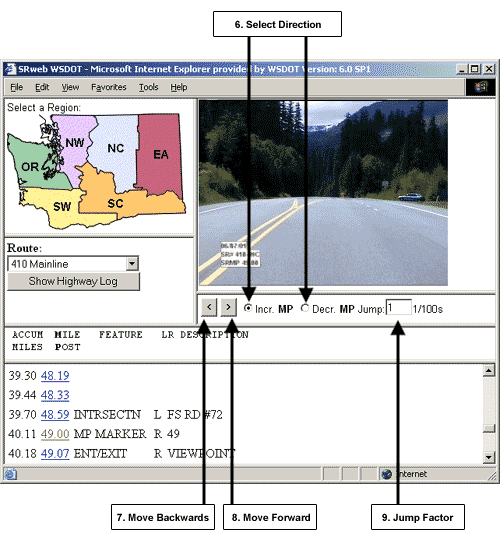
Step 6: Click on the  or or  radio button to specify a direction of travel. radio button to specify a direction of travel.
Step 7: Click the  button to move the displayed image backward 1/100 or .01 miles. button to move the displayed image backward 1/100 or .01 miles.
Step 8: Click the  button to move the displayed image forward 1/100 or .01 miles. button to move the displayed image forward 1/100 or .01 miles.
Step 9: To increase the mileage between images, change the number in the Milepost Jump Factor Box to a number greater than 1.
Note: SRweb images can only be displayed one at a time.
To exit SRweb, close the web page by clicking the "X" button in the top right of the main window.
^ Return to Top
More About SRweb
For questions or comments regarding SRweb, please Email SRweb support or contact (360) 570-2381
^ Return to Top
SRweb Additional Features
SRweb is an application which runs on your Internet browser. The menu options at the top of the window are for
your Internet browser, not SRweb. However, you can perform the following features through your Internet Browser:
Copying
To copy an image, right click on the image. A shortcut menu will appear. Drop down and click on Copy. This
will copy the current image to the Windows Clipboard. From the Clipboard, you can then paste the image to any Windows application that accepts images.
Emailing
To Email an image, right click on the image. A shortcut menu will appear. Drop down and click on Copy.
Create a new message through the Email application you are using. Right click and Paste the image into
your message.
Internet Explorer 6 users can right click on an image and choose E-Mail Picture... to Email an image.
Printing
To print an image, right click in the white portion of the frame where the image is located. A shortcut menu will appear. Drop down and click on Print. The print dialog box will appear. Click on the Options tab. In the Print
Frame, select "Only the selected frame" and click on Print.
Saving
To save an image, right click on the image. A shortcut menu will appear. Drop down and click on Save
Picture As. The image will save as a .JPG image by default.
^ Return to Top
|